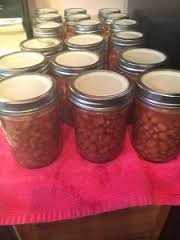
Canning pinto beans? Why would you want to do that? Let me count the ways.
- convenience
- convenience
- convenience
Well, you get the idea. It is very handy to have beans on your pantry shelf.

What can you do with canned beans?
Around here we make re-fried beans with a jar of pinto beans. Taco night has never been the same since I started canning pinto beans. All I do is drain off the liquid and whirl it up with my stick blender with a little chili powder and a splash of olive oil to give it a shine and Wha-lah re-fried beans, just like that. Now it just takes a minute to heat up on the stove or in a microwave.
We would be canning pinto beans if this was the only way we used them but it’s not. After a long morning of working on the farmstead we will chop up a fresh onion and heat up a jar or 2 of pinto beans along with a mini cornbread loaf I make for the freezer and have a great meal in a matter of minutes. It gives us the protein we need to get back out there and work the rest of the day.
If you want to make chili, a jar or two of canned beans is a great addition, especially if you are using your other home-canned goods like stewed tomatoes and homemade Rotel (tomatoes and green chilies) because the beans really absorbs the sweetness nicely and the juice in the jars of beans will help to thicken up the chili as well.
Your pressure canner will also allow you to start canning black beans along with pinto beans. I make small 8 ounce jelly size jars of black beans because we never eat as much of those at one sitting. We use canned black beans in our taco meat, that way some of the pickier eaters we have can’t turn down the amount of protein and fiber that the beans have to offer. I’ve never had one single complaint when making tacos or taco salad about the beans being in it, they really don’t even realize it.
I’m sure you will come up with your own great ways to use the canned beans around your house, so what are you waiting for? If you own a pressure canner, go ahead and drag it out and get ready to can up some beans with us today! It’s one of the easiest methods for pressure canning pinto beans you will ever come across.
If you don’t have a pressure canner/cooker, let me suggest this one:
Presto 01781 23-Quart Pressure Canner and Cooker
This pressure canner will not only allow you to can beans in it, you can also cook a couple of whole chickens in it or make some other big meal very quickly in it.
The reason I like this one over a smaller one is that you can double stack pints of beans in it so that you get more beans done in one run of canning. I can do 18 wide mouth jars of beans or 20 regular mouth jars at once. If I’m going to run my canner for over an hour, I want to fit all I can in there. Go ahead and order it today, because if you do, I get a few dollars from the sale (it doesn’t cost you any more) and that helps me to keep telling you about how to can beans and tell more stories from around my farmstead.
If you have an older pressure canner or recently found one at a garage sale or thrift store and there were no directions with it, you can find out the general directions for using a pressure canner here.
If you have never canned anything before, canning pinto beans is a great 1st project as they are fairly inexpensive to get started with and you can build your self-confidence using your equipment while putting some great items on your pantry shelf.
There are a couple of different ways that you can start canning pinto beans.
The first method requires soaking overnight and heating to a boil before putting in your hot jars and adding boiling water. You can find this method here: Canning beans with a pressure canner
The second method is more for the rebel type canner who doesn’t always follow the proper canning methods. It doesn’t necessarily mean it is an unsafe method, it just means that it is untested by the National Center for Home Food Preservation. It starts with a dry bean, sorted and washed well, put into a hot sterilized jar and topped off with boiling water to within 1 inch of the top before being pressure canned.
Here are the more detailed directions for canning pinto beans from a dry bean. Also known as “Ben’s Beans”
- Get your pressure canner out and place the rack in the bottom and add your first layer of pint jars with 1 inch of water in each and enough water to the bottom to be about 1 inch. (If using quart jars, just plan on one layer and go ahead and make it 2 inches of water in each jar and in the pressure canner.)

- Add a small pour of white vinegar to the pot to keep the hard water stains from getting on your jars and lids. (this step is important even if you think you don’t have hard water)
- Add your second layer of jars and put about an inch of water in those as well. (See picture above)
- Heat with the lid to the pressure canner just resting on the top and let it boil/steam to sanitize your jars while you are sorting and washing your beans.
- Sort through your beans to get out any dirt, rocks and corn that might be in the bag. The easiest way to do this is to use a white bowl and add a handful at a time, removing anything that doesn’t look quite right as you go along. Dump them into a big bowl and keep adding to it.
- Get out a 1/2 cup measuring cup and add up how many pint jars you have and then put that many 1/2 cup scoops in the strainer to be washed. You can make them heaping scoops if you like a fuller jar of beans with less liquid, like I do. (If using quart jars, you will need to use a 1 cup measuring cup and it can be heaping as well) By pre-measuring with how many jars you have to fill you will eliminate washing beans that you don’t have room for in your canner.
- Put on some water to boil so that you can fill your jars with it. Figure 1 1/2 cups of water per pint jar and 3 cups for each quart jar just to be on the safe side. I use my 8 quart stock pot and add to it if needed.
- Now you can put your lids on the stove in a pan of water to heat to a simmer, not a boil. I know they recommend that the new lids you can buy don’t need to be heated but I prefer to use the Tattler Reusable Regular Canning Lids and Rubber Rings
for canning pinto beans and I recommend that you get some too.

- Your stove should now look like this:

- Wash the pinto beans thoroughly! This is very important for canning pinto beans this way. Now, wash them again under a vigorous stream of water while moving the beans around with your hands. Rinsing and washing is one of the most important steps of canning pinto beans.

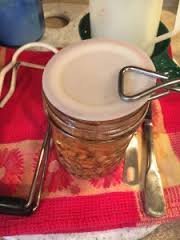
- Now that they are clean you can get your work area together next to the stove. Put out a dishtowel where you will be working to set your jars while they are being filled and gather up your canning salt, jar lifter
, canning funnel
, something to transfer your boiling water to the jars with, a butter knife to get out the air bubbles and some tongs to lift out your reusable lids or a magnet wand for metal lids. It should look similar to this:

- Now you water should be boiling and your jars sanitized with your lids simmering. Fold a paper towel up into about a 3 inch square and wet it with white vinegar, you’ll be wiping the tops of your jars with it.

- Start by getting out the top layer of jars and placing them on your toweled work surface. Dump the water from them into the canner using your jar lifter as you go. (Honestly, I work with one jar at a time, but it takes some practice when double stacking to be able to get the filled jars of beans onto the bottom when you use the pressure canner to sanitize the jars.)
- Add your salt to each jar. Up to 1/2 tsp for pints or 1 tsp for quarts. I often use less or none at all. It’s up to you the amount you use when canning pinto beans.

- Now using your canning funnel on top of the jar, you will add beans to them all with the 1/2 Cup measuring cup for pints or 1 Cup for quarts.


- Now you can fill the jars to within 1 inch of the rim with boiling water. (You can also add up to 2 Tablespoons of chopped bacon or ham to each pint or 4 Tablespoons of meat to each quart jar before filling with water, I don’t because I pressure can pinto beans mainly for refried beans)

- Use your butter knife to remove any air bubbles that may be caught between the beans by gently stirring. This step must not be skipped when canning pinto beans as it makes it hard for the pressure to rise in your canner if their are air bubbles left in the jars.

- Wipe your rims clean with the vinegar paper towel and add the lids and rings to each jar.


- Now, if using pint jars, you will start taking out the bottom layer of jars from your canner, dumping out the water into the pressure canner as you go, and add back in a full jar using your jar lifter tool each time until you have all full jars of pinto beans on the bottom of your canner.

- Fill the next layer of jars the same way and stagger them in the canner once they are full so that they are not sitting right on top of the jar underneath it. (This does not apply to quart jars)
- Once you have your canner full of pinto beans (or whatever kind of bean you are pressure canning) you can lock the lid on and vent the steam for 10 minutes (or until it start building pressure on it’s own). I normally start timing the 10 minutes once the vent lock raises as seen here:

- Place the weight on the top and bring it up to 10 pounds of pressure, or whatever is the correct amount for your elevation. The first picture is without the weight, the second picture shows the weight on.


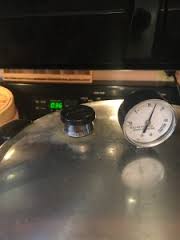
- Once you achieve the right amount of pressure, start your timer for 75 minutes if you are canning pints or 90 minutes if you are canning in quart sized jars.(Don’t pay any attention to my stove timer, I forgot to get a picture of the proper pressure until I only had 36 minutes left.)

- It’s important to note that you will need to turn your heat down in small increments once you start reaching 10 pounds of pressure or it will keep building. By the time I am a few minutes into my time after reaching pressure, I am at a medium low to low setting and leave it there throughout the canning time. I turn the heat down from high to medium high then wait a few minutes, then turn down to medium and wait a few minutes and so on until you are no longer building a higher pressure. If you turn it down all at once your jars are at risk for siphoning out.
- Once your time is up, turn off the heat and allow the pressure canner to come back down to zero pounds pressure naturally. It should take about 40 minutes to an hour. (You will hear your vent lock drop)
- Now you can lift your weight once the pressure has dropped and wait another 2 minutes before lifting the lid off. (Always open it away from your face so that the steam doesn’t burn you, and be prepared to sit it on your sink fast because it will be hot.)
- Wait another 10 minutes before removing the jars with your jar lifter and be sure to place the hot jars on a towel on your counter.

- Check the jars after they are cool (this could take up to 24 hours, but I normally check mine at about 12 hours) to see if they are sealed by removing the rings. If they didn’t seal properly, put them in the fridge so that you can use them up right away. (It happens, don’t get discouraged!)
- Wash your jars to get any residue off of them and proudly place them in your pantry to await whatever great meal you have in store for them!
- It’s important to store your jars without the rings on them so that if you get a seal failure you will know it right away when you grab your jar to cook with it. If you leave your rings on during storage, you could have a seal failure and then it can reseal without you knowing making the pinto beans unsafe for eating.
Congratulations!!! You did it! Now it wasn’t that hard was it? I’m so glad you took the time to go through pressure canning pinto beans with me, step by step. It will be one of your favorite home-canned items once you get the hang of it!


