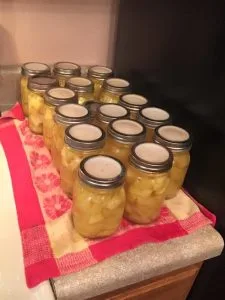
Canning Pineapples is something we do every year at this time at Wild heaven Farms. The grocery stores usually price them right around $1 each for the New Year holiday so we stock up now for the whole year.

I always try to buy the ones that look to be the same color, whether it is all green or all golden yellow so that they will all be ready to can at the same time. If you get them all green, don’t worry because it only takes a week or so to get them to ripen up enough to can. The trick to getting them to ripen evenly is to turn them upside down in a box that will hold them all. Some people say they are as ripe as they will ever be when you buy them but I have always found that they are much sweeter after a week to 10 days of being upside down.
Canning Pineapples Directions:
Peel and core your pineapples and cut into the sizes you like to eat. I always just do chunks because I don’t have a fancy cutting tool to make the rings. I save the cores and eyes that I cut off to make juice. I feed the peels to the chickens and pigs. They love them! I always tease that I am marinating the hogs from the inside out.
Gather all your canning goodies, like the jar lifter and canning funnel so you have them handy for later on.
You will also need to make a batch of syrup to use as the liquid. You can absolutely just can them in water if you have an issue with sugar. I like to add just a little sugar to the water and bring it to a boil to make sure the sugar has dissolved. I use 1 cup of sugar to 10-12 cups of water. The amount you will need will vary depending on the amount of pineapples you have to can up.
Now you can sterilize your jars and lids. I do the jars right in the same pot that I plan on using to waterbath in. (If you need a break after all that peeling and chopping, now is the time to take a few minutes because the waterbath takes quite a while to come to a boil.) It saves me some space on the stove. I warm my jar lids in a small saucepan and just allow it to come almost to a boil and hold it there until ready to use. The lids I am using are Tattler brand reusable canning lids. They are fairly expensive to get started with using, but over the long run if you plan to can for many years, it will save you lots. If I had to buy lids every time I wanted to can something, I might not put as much into the pantry as I do. Check them out below on Amazon. You can always buy a couple dozen to get started and then purchase the big package they have if you like them, like I do.
Authentic Tattler E-Z Seal Reusable Canning Lids – Trial Pack 3 Doz Regular + 3 Doz Wide
Once you have everything chopped and your jars are boiling, start warming your pineapples in the syrup you made earlier. I just dump them in and allow it to heat up right at the time my water starts boiling in the waterbath canner. That way everything is ready at the same time for canning pineapples.
Once the pineapples are warmed throughout, use a slotted spoon to fill the hot jars, one at a time. Fill them with pineapples to a generous 1/2 inch headspace. Now use a ladle or heat-safe measuring cup to get the syrup mixture from the pineapples and fill the jar leaving the same 1/2 inch from the top of the jar. I use a stainless steal butter knife to move around the pineapples and make sure there are no air bubbles in the jar and then add more liquid if necessary to keep it at 1/2″ from the top of the jar.
Now, use a paper towel wet with white vinegar to wipe the rim of the jar before putting the lid and ring on. This vinegar trick works for a canning projects, not just when you are canning pineapples. (If you are using Tattler’s like me, apply the lid and rubber seal together and once you add the ring, hold the lid with one finger and use the other hand to tighten the ring.)
Add the jar full of pineapples back into the hot water bath pan with your jar lifter and remove another empty jar and continue to fill each one in the same manner until all your pineapples are gone.
Once you have all your jars filled, make sure the water level is a couple inches above the filled jars and put on the lid, processing pint jars in boiling water for 15 minutes and quarts for 20 minutes.
After the time is up, turn off the heat and remove the lid, waiting another 5 minutes before removing the jars to the counter-top lined with a kitchen towel.
Canning Pineapples is one of the easiest projects you can do as a beginner. The fact that they can be waterbathed makes it easy for anyone to do without having a pressure canner, all you need is a pot big enough to hold the jars and have them covered with boiling water by a couple inches.

Pingback: Mason Jar Storage Lid - Kitchen Hack - Appalachian Cooks